> For the complete documentation index, see [llms.txt](https://docs.patchmypc.com/llms.txt). Markdown versions of documentation pages are available by appending `.md` to page URLs; this page is available as [Markdown](https://docs.patchmypc.com/patch-my-pc-publisher/customizations/list-customizations/add-pre-post-scripts.md).
# Add Pre/Post Scripts option in Patch My PC Publisher
*Applies to: Patch My PC Publisher V3.x*\
*Available at level: Product*\
*Available on tab: WSUS Updates, ConfigMgr Apps, Intune Apps, Intune Updates*
The **Add Pre/Post Scripts** option in Patch My PC (PMPC) Publisher lets you run your own scripts before or after an installation or an uninstallation. This includes the following scenarios:
* Pre-install
* Post-install
* Pre-uninstall
* Post-uninstall.
This feature provides flexibility for handling scenarios that the installer alone does not support. It allows you to perform preparation steps before an install or update, as well as cleanup or validation steps after completion.
Common use cases include uninstalling previous versions or different installer variants, such as removing an EXE-based installation to standardize on an MSI deployment, removing conflicting or superseded software, and performing environment-specific actions.
The feature also allows additional files and folders to be bundled with the application or update content, ensuring all required supporting files are available during installation.
Selecting this option opens the configuration dialog where scripts, arguments, and additional content can be defined.
The Add Pre/Post Scripts form defines how scripts and additional content are associated with an application or update. The options are available separately for Install and Uninstall.
## Install and Uninstall tabs
The **Install** tab controls scripts that are run during installation or update, whereas the **Uninstall** tab controls the scripts that run during application removal.
Each tab is configured independently, allowing different pre- and post-scripts to be defined for install and uninstall scenarios.
### Pre/Post Script
The **Pre Script** and **Post Script** fields support the following file types.
* .bat
* .ps1
* .vbs
* .exe
* .msi
The **Pre Script** field allows you to select a script that runs before the install or uninstall begins. This is commonly used for preparation tasks such as uninstalling previous versions, removing a different installer variant, or validating prerequisites.
The **Post Script** field allows you to select a script that runs after the install or uninstall completes. This is commonly used for cleanup, configuration, validation, or logging tasks.
### Argument
The **Argument** field allows parameters to be passed to the selected script at runtime.
#### Insert Variable
The **Insert Variable** links allow supported variables to be inserted directly into the **Argument** field. These variables resolve at runtime and can be used to pass values such as vendor name, product name, version, package ID, and installer return code to the script.
#### **Don’t attempt software update if the pre script returns an exit code other than 0 or 3010**
The **Don’t attempt software update if the pre script returns an exit code other than 0 or 3010** checkbox can be checked if the deployment must stop when the pre script fails.
When this happens, Patch My PC ScriptRunner (which manages the installation process) stops and returns a specific exit code to the calling client, such as the ConfigMgr client, the Windows Update Agent, or the Intune Management Extension.\
\
There are two exit codes you may see when a pre-script does not run successfully:
* **32768 -** This exit code is returned when a PMPC recommended pre-install script fails (see [Recommended Scripts](#recommended-scripts)). If the recommended script cannot run or does not exit cleanly, ScriptRunner stops the installation immediately and returns **32768**. This behavior is always enforced for recommended scripts.
* **32767 -** This exit code is returned when a custom pre script, supplied by you, fails and the checkbox for **Don’t attempt software update if the pre script returns an exit code other than 0 or 3010** is selected. If that option is not selected, ScriptRunner continues even if your supplied script returns a non-zero exit code.
{% hint style="info" %}
**Note**
See [PatchMyPC-ScriptRunner – Known Exit Codes](https://patchmypc.com/kb/script-runner-exit-codes/) for more information on ScriptRunner exit codes.
{% endhint %}
#### **Run the pre-update script before performing any auto-close or skip process checks**
The **Run the pre-update script before performing any auto-close or skip process checks** checkbox can be checked if the pre-script must run before conflicting process handling. If you are using the [Manage Conflicting Processes](/patch-my-pc-publisher/customizations/list-customizations/manage-conflicting-processes.md) option and this box is enabled, the pre-script runs before the process check.
{% hint style="danger" %}
**Important**
These two checkboxes only apply to Pre-scripts and have no effect on Post-scripts:
* **Don’t attempt software update if the pre script returns an exit code other than 0 or 3010**
* **Run the pre-update script before performing any auto-close or skip process checks**
{% endhint %}
### Additional Files and Folders
The **Additional Files and Folders** sections (shared between the **Install** and **Uninstall** tabs) allow you to bundle extra content with the application or update package.
This content is included in the package even if no pre- or post- scripts are configured.
Any files and folders added here are packaged together with the application or update content and are downloaded to the local installation source directory on the client device at install or update time, where it is available to both install and uninstall scripts.
#### **Additional files**
Use **Additional files** to include individual files that must be present during installation or uninstallation. For example, configuration files, license files, or other supporting resources.
To add files:
1. Click **Browse** in the **Additional files** section.
2. Browse to the required location and select the required file(s).
3. Click **Open** to add the file(s) to the list.
{% hint style="info" %}
**Note**
If you need to bundle an MST file with an MSI application, use the [Manage MST File](/patch-my-pc-publisher/customizations/list-customizations/manage-mst-file.md) customization option.
{% endhint %}
#### **Additional folders**
Use **Additional folders** to include entire folders and their contents.
To add folders:
1. Select **Browse** in the **Additional folders** section.
2. Browse to the required location and select the required folder(s).
3. Click **Select Folder** to add the folder(s) to the list.
All files and subfolders within the selected folder are included in the package.
#### **Packaging and availability**
Additional files and folders are shared between the **Install** and **Uninstall** tabs. The same bundled content is available to both install and uninstall scripts because all scripts and content are packaged together into a single application or update package.
All bundled files and folders are downloaded to the local installation source directory on the client device at runtime. Scripts and installers can reference this content using relative paths.
For example, a script can reference a bundled file or folder by using the local source directory path, such as:
```powershell
.\config.xml
.\SupportFiles\setup.ini
```
This allows scripts to source configuration files or other supporting content directly from the packaged source without relying on external locations.
## Recommended Scripts
The **Recommended Scripts** tab contains scripts provided by Patch My PC for certain products that, for example, cannot remove older versions on their own, such as Oracle Java. If the recommended script cannot run or does not exit cleanly, ScriptRunner stops the installation immediately and returns exit code **32768**.
### Disable the Patch My PC recommended post-update script for this product
If required, check the **Disable the Patch My PC recommended post-update script for this product** in the event of any issues.
## To configure a Pre- or Post-script
1. Click the relevant tab.
2. If you want to add a script, continue; otherwise, go to Step 5.
3. Click **Browse** beside the relevant script field and browse to the location containing the required script file and select it.
4. Click **OK** to populate the field.
5. In the **Argument** field, enter any required parameters.
6. Place the cursor where a variable is required.
7. Select the appropriate option under **Insert Variable** to add it to the **Argument** field.
{% hint style="info" %}
**Note**
Variables are expanded at runtime and provide application-specific values to the script.
{% endhint %}
{% hint style="success" %}
**Tip**
If you need to include quotes in the **Argument** field, escape the quotes with a backslash. For example:
```
-String \"Hello world\"
```
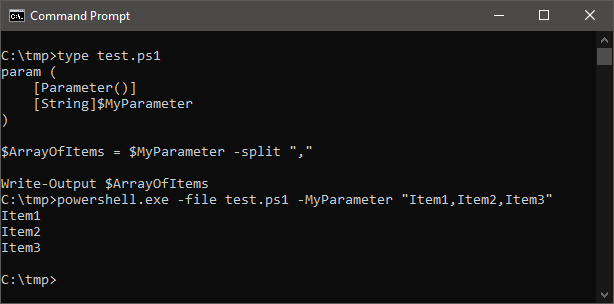
Also, when passing multiple values to a PowerShell script, do not use traditional PowerShell array syntax in the **Argument** field, because as PowerShell is launched from **cmd.exe**, syntax like `"Item1","Item2"` is not interpreted as a single array value.
Instead, pass a single delimited string and split it inside the script. For example:
```
-MyParameter "Item1,Item2,Item3"
```
{% endhint %}
8. Configure any required [Additional Files and Folders](#additional-files-and-folders).
9. Click **OK.**
## Using Uninstall-Software.ps1
A commonly used approach for removing existing software before installation is to use the Uninstall Software community script provided by Patch My PC. This script is useful when you need to uninstall a previous version, remove a different installer variant, or clean up related software before deploying a standardized package.
The script is available from the Patch My PC Community Scripts repository:
### To configure the Script as a Pre-Script
1. Download **Uninstall-Software.ps1** from the community repository.
2. In the **Add Pre/Post Scripts** form, select the **Install** or **Uninstall** tab as required.
3. Select **Browse** next to the Pre Post Script field.
4. Select **Uninstall-Software.ps1** and click **Open**.
### Configure the Script Arguments
The Uninstall Software community script supports parameters such as **DisplayName** to determine which application should be uninstalled. The script documentation in the repository shows examples written in native PowerShell syntax.
When configuring this script in Publisher, the **Uninstall-Software.ps1** script file itself is selected in the **Pre Script** field. The **Arguments** field must contain only the parameters.
{% hint style="info" %}
**Note**
Any quotation marks in the arguments must be escaped with a backslash.
{% endhint %}
The following example is shown in the script [README](https://github.com/PatchMyPCTeam/Community-Scripts/blob/main/Uninstall/Pre-Uninstall/Uninstall-Software/readme.md) and represents native PowerShell usage.
```powershell
Uninstall-Software.ps1 -DisplayName "Greenshot"
```
In Publisher, configure the script as follows.
* **Pre Script**\
`Uninstall-Software.ps1`
* **Argument**\
`-DisplayName \"Greenshot\"`
In this example, the script attempts to uninstall any installed application with a display name matching **Greenshot** before the main installation or uninstallation proceeds. Other parameters documented in the script [README](https://github.com/PatchMyPCTeam/Community-Scripts/blob/main/Uninstall/Pre-Uninstall/Uninstall-Software/readme.md) can also be used to perform more targeted uninstall
Advanced Configurations and Examples
The following knowledge base articles provide practical examples of how to leverage pre and post-scripts or additional files when configuring applications and updates in the Publisher:
* [How to customize your TeamViewer App or Update](https://patchmypc.com/how-to-customize-teamviewer)
* [Advanced Application Configuration using Pre/Post Scripts](https://patchmypc.com/advanced-pre-post-scripts)
* [Pass Variables into Pre and Post Scripts](https://patchmypc.com/pass-variables-into-pre-and-post-scripts)
---
# Agent Instructions
This documentation is published with GitBook. GitBook is the documentation platform designed so that both humans and AI agents can read, navigate, and reason over technical content effectively. Learn more at gitbook.com.
## Querying This Documentation
If you need additional information that is not directly available in this page, you can query the documentation by asking a question.
Perform an HTTP GET request on the following URL with the `ask` and `goal` query parameters:
```
GET https://docs.patchmypc.com/patch-my-pc-publisher/customizations/list-customizations/add-pre-post-scripts.md?ask=&goal=
```
`ask` is the immediate question: it should be specific, self-contained, and written in natural language.
`goal` is what the user is ultimately trying to achieve, the reason they need the answer. Sharing it helps GitBook give you a better, more relevant answer. A goal is most helpful when it describes the outcome the user wants rather than restating the question. For example, with `ask=how do I create an API token`, a goal like `automate deployments from our CI pipeline` lets GitBook tailor the answer to that use case.
The response will contain a direct answer to the question and relevant excerpts and sources from the documentation.
Use this mechanism when the answer is not explicitly present in the current page, you need clarification or additional context, or you want to retrieve related documentation sections.


 {% endhint %}
8. Configure any required [Additional Files and Folders](#additional-files-and-folders).
9. Click **OK.**
## Using Uninstall-Software.ps1
A commonly used approach for removing existing software before installation is to use the Uninstall Software community script provided by Patch My PC. This script is useful when you need to uninstall a previous version, remove a different installer variant, or clean up related software before deploying a standardized package.
The script is available from the Patch My PC Community Scripts repository:
{% endhint %}
8. Configure any required [Additional Files and Folders](#additional-files-and-folders).
9. Click **OK.**
## Using Uninstall-Software.ps1
A commonly used approach for removing existing software before installation is to use the Uninstall Software community script provided by Patch My PC. This script is useful when you need to uninstall a previous version, remove a different installer variant, or clean up related software before deploying a standardized package.
The script is available from the Patch My PC Community Scripts repository: