> For the complete documentation index, see [llms.txt](https://docs.patchmypc.com/llms.txt). Markdown versions of documentation pages are available by appending `.md` to page URLs; this page is available as [Markdown](https://docs.patchmypc.com/patch-my-pc-cloud/deployments/deploy-app/configurations-tab/additional-tools/scripts.md).
# Configure Scripts in a Patch My PC Cloud Deployment
*Applies to: Patch My PC Cloud*
{% hint style="info" %}
**Note**
Using the **Scripts** tool is optional. However, if you deploy a Custom App where the **Installer Type** is set to **Installation Script**, the **Scripts** tool is automatically added to your deployment. See the [Deploying Scripted Custom Apps](#deploying-scripted-custom-apps) section in this article for more information.
{% endhint %}
The **Scripts** tool in the Patch My PC (PMPC) Cloud deployment wizard allows you to configure settings for install and uninstall scripts.
This includes regular PowerShell (.ps1) scripts as well as PSADT scripts, which can be specified directly in our Portal without having to upload the required PSADT module files separately.
{% hint style="info" %}
**Note**
Although we support both PSADT v3 and V4, we recommend using V4 whenever possible.
Also:
* Scripts will be run in the same context as the application.
* Each install script is limited to 1 MB per script, with a total size limit of 4 MB for all scripts.
* There is a limit of 50,000 characters per script.
We currently support the following script types:
* .BAT
* .CMD
* .PS1
* .VBS
{% endhint %}
{% hint style="danger" %}
**Important**
Currently, scripts containing `"${env:ProgramFiles(x86)}"` or `"${env:ProgramFiles}"` cannot be uploaded as Cloudflare is falsely identifying them as a false positive related to Log4j exploits. We are actively working with them to resolve this, but as this is outside our control, we cannot provide an estimated resolution time.
To work around this issue, see the [Resolution](/patch-my-pc-cloud/troubleshoot/deployments/typeerror-failed-to-fetch-error-when-trying-to-upload-a-pre-or-post-script-in-cloud.md#resolution) section of ["TypeError: Failed to fetch" error when trying to upload a Pre or Post Script](/patch-my-pc-cloud/troubleshoot/deployments/typeerror-failed-to-fetch-error-when-trying-to-upload-a-pre-or-post-script-in-cloud.md).
{% endhint %}
To add a script:
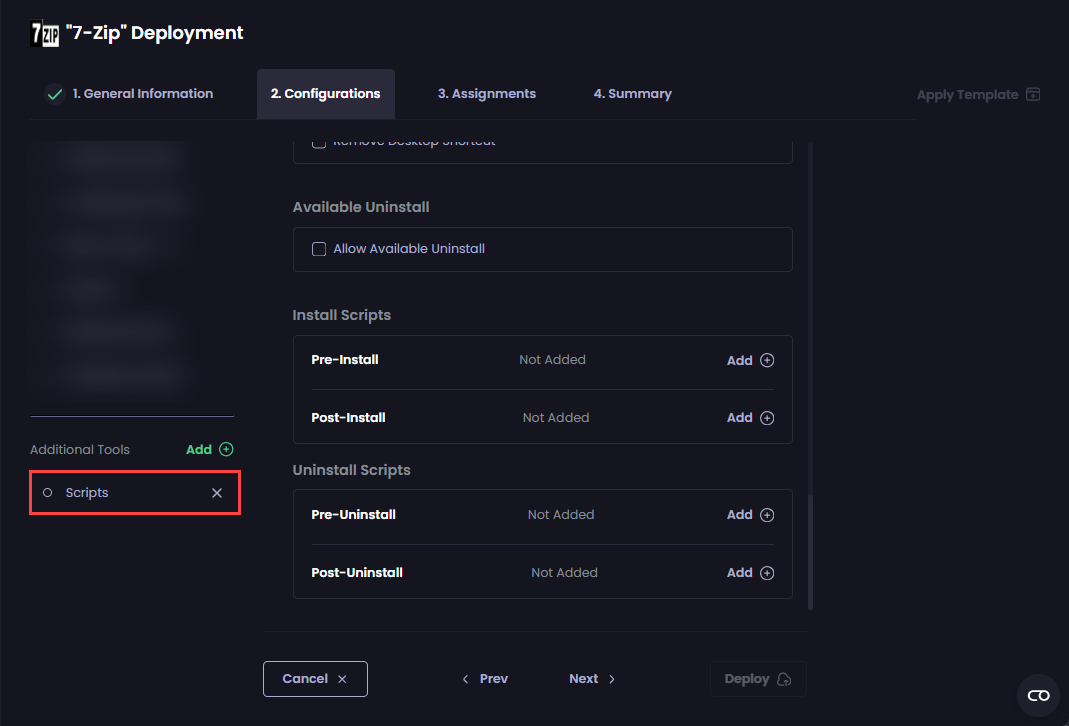
1. Add the [**Scripts** tool](/patch-my-pc-cloud/deployments/deploy-app/configurations-tab.md#adding-additional-tools).
2. Click the **Scripts** tool.
{% hint style="info" %}
**Note**
If the app includes our recommended scripts, you will see the **Customer Scripts | PMPC Scripts** toggle shown above the **Install Scripts** section.
See [PMPC Scripts](/patch-my-pc-cloud/deployments/technical-references/use-pmpc-scripts.md) for more details on the options you have for managing these scripts.
{% endhint %}
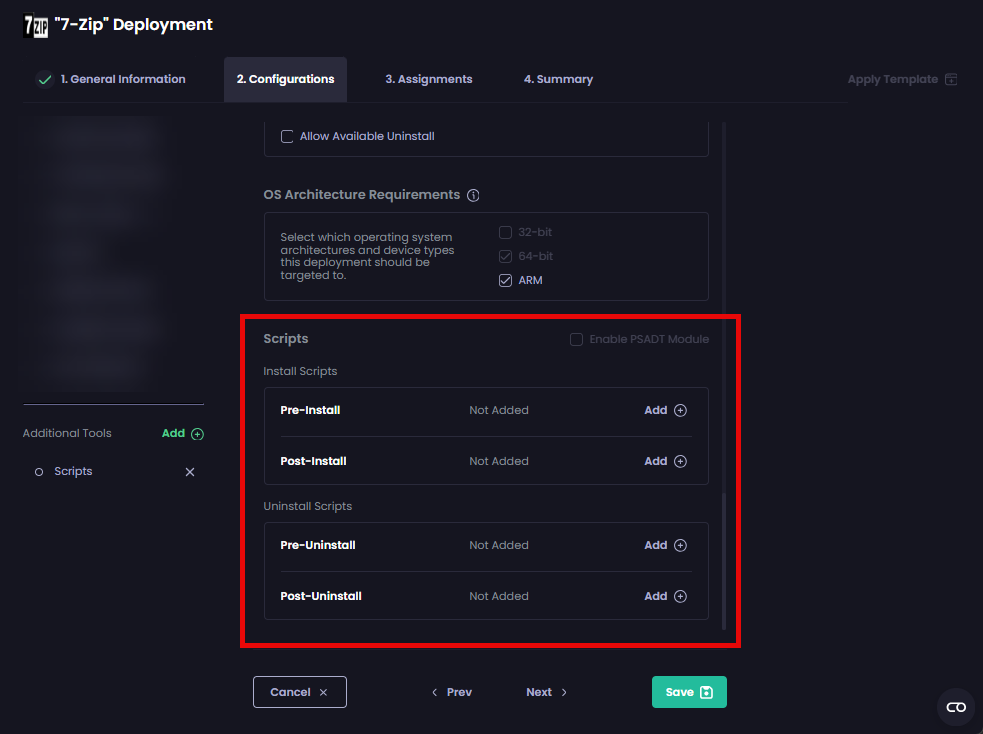
3. Click **Add** beside the relevant script option to add a script, then configure the required settings as per the relevant articles:
* [Pre-Install Script](/patch-my-pc-cloud/deployments/deploy-app/configurations-tab/additional-tools/scripts/pre-install-scripts.md) - a script that can be run before the installer runs.
* [Post-Install Script](/patch-my-pc-cloud/deployments/deploy-app/configurations-tab/additional-tools/scripts/post-install-scripts.md) - a script that can be run after the installer runs.
* [Pre-Uninstall Script](/patch-my-pc-cloud/deployments/deploy-app/configurations-tab/additional-tools/scripts/pre-uninstall-scripts.md) - a script that can be run before the uninstaller runs.
* [Post-Uninstall Script](/patch-my-pc-cloud/deployments/deploy-app/configurations-tab/additional-tools/scripts/post-uninstall-scripts.md) - a script that can be run after the uninstaller runs.
{% hint style="info" %}
**Note**
If you upload [Extra Files](/patch-my-pc-cloud/deployments/deploy-app/configurations-tab/additional-tools/extra-files.md) as part of your Patch My PC (PMPC) Cloud Deployment, you can reference those files in any of the [Scripts](/patch-my-pc-cloud/deployments/deploy-app/configurations-tab/additional-tools/scripts.md) in the same deployment by building a path relative to the script's current location. See [Referencing Extra Files in Scripts](/patch-my-pc-cloud/deployments/technical-references/reference-external-scripts.md) for more information.
Also, if any PSADT commands are detected in any of the scripts configured in the **Scripts** section, a warning is displayed about ensuring that any devices to which this deployment is assigned have at least .NET Framework 4.7.2 installed.
If this warning appears, check the **Enable PSADT Module** checkbox (available only if PSADT commands are detected), which will ensure the PSADT Toolkit is uploaded to Intune when this deployment is created.
If this warning is not displayed, you should not check the **Enable PSADT Module** checkbox.
{% endhint %}
{% hint style="danger" %}
**Important**
Checking the **Enable PSADT Module** checkbox causes the following behaviors:
* When [creating a deployment](/patch-my-pc-cloud/deployments/deploy-app.md):
* If a PSADT script is included and you have not manually interacted with the checkbox, it will be **automatically enabled**.
* If you manually change the checkbox state, your selection will be preserved.
* When [editing a deployment](/patch-my-pc-cloud/deployments/manage-deployments/edit.md):
* The checkbox is treated as **manually configured**, and its state will not be automatically changed.
* If a PSADT script is added during edit, the checkbox will **not be auto-enabled** and must be adjusted manually if needed.
{% endhint %}
## Deploying Scripted Custom Apps
As previously mentioned, if you deploy a Custom App where the **Installer Type** is set to **Installation Script**, the **Scripts** tool is automatically added to your deployment.
The **Scripts** tool will also show the **Install File** and **Uninstall Command** fields. Clicking **View** next to these fields opens the Script Editor, which displays the associated script (this is read-only, so you cannot make any changes).
## Next Steps
If you do not want to configure any additional settings, click **Next** to move to the [Assignments](/patch-my-pc-cloud/deployments/deploy-app/assignments-tab.md) tab.
Otherwise, navigate to the relevant tool to configure the required settings, which are explained in the relevant section.
---
# Agent Instructions
This documentation is published with GitBook. GitBook is the documentation platform designed so that both humans and AI agents can read, navigate, and reason over technical content effectively. Learn more at gitbook.com.
## Querying This Documentation
If you need additional information that is not directly available in this page, you can query the documentation by asking a question.
Perform an HTTP GET request on the following URL with the `ask` and `goal` query parameters:
```
GET https://docs.patchmypc.com/patch-my-pc-cloud/deployments/deploy-app/configurations-tab/additional-tools/scripts.md?ask=&goal=
```
`ask` is the immediate question: it should be specific, self-contained, and written in natural language.
`goal` is what the user is ultimately trying to achieve, the reason they need the answer. Sharing it helps GitBook give you a better, more relevant answer. A goal is most helpful when it describes the outcome the user wants rather than restating the question. For example, with `ask=how do I create an API token`, a goal like `automate deployments from our CI pipeline` lets GitBook tailor the answer to that use case.
The response will contain a direct answer to the question and relevant excerpts and sources from the documentation.
Use this mechanism when the answer is not explicitly present in the current page, you need clarification or additional context, or you want to retrieve related documentation sections.
 If this warning appears, check the **Enable PSADT Module** checkbox (available only if PSADT commands are detected), which will ensure the PSADT Toolkit is uploaded to Intune when this deployment is created.
If this warning is not displayed, you should not check the **Enable PSADT Module** checkbox.
{% endhint %}
{% hint style="danger" %}
**Important**
Checking the **Enable PSADT Module** checkbox causes the following behaviors:
* When [creating a deployment](/patch-my-pc-cloud/deployments/deploy-app.md):
* If a PSADT script is included and you have not manually interacted with the checkbox, it will be **automatically enabled**.
* If you manually change the checkbox state, your selection will be preserved.
* When [editing a deployment](/patch-my-pc-cloud/deployments/manage-deployments/edit.md):
* The checkbox is treated as **manually configured**, and its state will not be automatically changed.
* If a PSADT script is added during edit, the checkbox will **not be auto-enabled** and must be adjusted manually if needed.
{% endhint %}
## Deploying Scripted Custom Apps
As previously mentioned, if you deploy a Custom App where the **Installer Type** is set to **Installation Script**, the **Scripts** tool is automatically added to your deployment.
The **Scripts** tool will also show the **Install File** and **Uninstall Command** fields. Clicking **View** next to these fields opens the Script Editor, which displays the associated script (this is read-only, so you cannot make any changes).
If this warning appears, check the **Enable PSADT Module** checkbox (available only if PSADT commands are detected), which will ensure the PSADT Toolkit is uploaded to Intune when this deployment is created.
If this warning is not displayed, you should not check the **Enable PSADT Module** checkbox.
{% endhint %}
{% hint style="danger" %}
**Important**
Checking the **Enable PSADT Module** checkbox causes the following behaviors:
* When [creating a deployment](/patch-my-pc-cloud/deployments/deploy-app.md):
* If a PSADT script is included and you have not manually interacted with the checkbox, it will be **automatically enabled**.
* If you manually change the checkbox state, your selection will be preserved.
* When [editing a deployment](/patch-my-pc-cloud/deployments/manage-deployments/edit.md):
* The checkbox is treated as **manually configured**, and its state will not be automatically changed.
* If a PSADT script is added during edit, the checkbox will **not be auto-enabled** and must be adjusted manually if needed.
{% endhint %}
## Deploying Scripted Custom Apps
As previously mentioned, if you deploy a Custom App where the **Installer Type** is set to **Installation Script**, the **Scripts** tool is automatically added to your deployment.
The **Scripts** tool will also show the **Install File** and **Uninstall Command** fields. Clicking **View** next to these fields opens the Script Editor, which displays the associated script (this is read-only, so you cannot make any changes).
